An Andor iXon+888 EMCCD camera can be mounted on the RC focus of the RCC Telescope as well as on the 50 cm Cassegrain telescope.
Parameters
Specifications
- Sensor: e2V CCD201-20
- Sensor size: 1024*1024
- Pixel size: 13 μm * 13 μm
- Image area: 13.3 mm * 13.3 mm
- Active area pixel well depth: 80 000 electron (typ.)
- Gain regeister pixel well depth: 730 000 electron (typ.)
- Max readout rate: 10 MHz
- Frame rates (full frame): 8.9 frames per sec
- Read noise (10 MHz): 1 to 47 electron
- Peak quantum efficiency (575 nm, typ.): 92.5%
- Cooling: thermoelectric + liquid, -90°C
Optical parameters
On the 1 m RCC telescope:
- Field of view: 3.36 arcmin x 3.36 arcmin
- Resolution: 0.2 arcsec per pixel
On the 50 cm Cassegrain telescope:
- Field of view: 6.88 arcmin x 6.88 arcmin
- Resolution: 0.4 arcsec per pixel
Usage
The camera itself can be controlled via a GUI, therefore the optimal way to reach the controlling computer (in case of the RCC) m16 is by VNC protocol, e.g.:
xvncviewer -bgr233 -via root@m16 :42
m16 can only be reached from the internal network. Screen 42 should be used. The switch bgr233 reduces the color depth resulting in lower latency.
On m16, the program ixon-server should always be running. Usually, the user does not have to start it. In case of a power failure, or software crash, it can be started with the command (via screen)
ixon-server /usr/local/etc/ixon-server/ixon-server.cfg
Before restarting m16, the ixon-server has to be stopped. It can be carried out via telnet:
telnet localhost 32768
After connecting to the server, the command shutdown stops the server itself. The connection can be terminated by closeconn. Do this only, if you are absolutely sure about the results!
The camera controlling program can be started by the following command:
ixon-gui
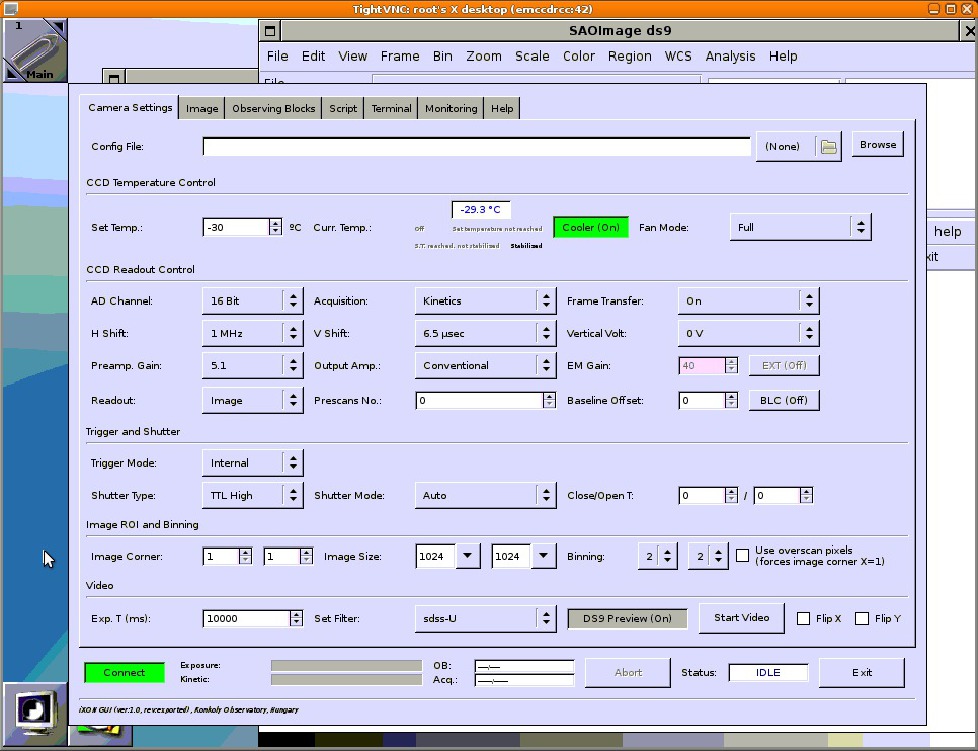
The FITS viewing program DS9 has to be started by the user as well. A typical screen of ixon-gui can be seen below.

First of all, the connection can be established by pressing the Connect button at the lower-left corner of the window. The camera cooling can be controlled via the the Set Temp input field. Note that the power usage of the cooler is not indicated explicitly. If the current temperature is indicated by blue numbers, then the temperature set can be hold safely. Without the water cooler, a temperature of <math>\approx -80^{\circ}\mathrm{C}</math> can be reached. With the circulatory system installed, the threshold is around <math>-100^{\circ}\mathrm{C}</math>.
On the CCD Readout Control section on the above figre typical settings are shown. Change these only if you are certain about what you are doing!
The camera can be used in non-EM mode as well, in this case, the Output Amp field should be set to Conventional. Otherwise, set it to EM. The typical value of the EM gain is 40.
For dark frames, the field Shutter mode should be set to closed. The exposure time is given in milliseconds. Also note that the lowest achievable time depends on the trimming (it can be set in the input fields Image Size) and the binning. 2x2 binning is resonable to use in most cases. While doing lucky imaging 1x1 binning might be a better choice.
Observing sequences can be defined on the panel Observing Blocks in a self-explanatory way. The filter field should be left on U. The filters can be set via the program acectrl running on m5. In the spectrograph frontend, there are two built-in filter wheels. Currently a Johnson-Cousins BVRI set is installed. The filter can be changed with the following command
acectrl --filter-1 n
where n indicates the number of the filter:
 - 0: empty
 - 1: B
 - 2: V
 - 3: R
 - 4: I
 - 5: clear
For a more detailed description of acectrl, see article ACE spectrograph.
Gallery
-
The EMCCD mounted on the RCC telescope (photo by Miklós Rácz).
-
The EMCCD mounted on the Cassegrain telescope (photo by Miklós Rácz).
| ||||||||

